Why NetSuite 1099 Reporting Matters for Your Business
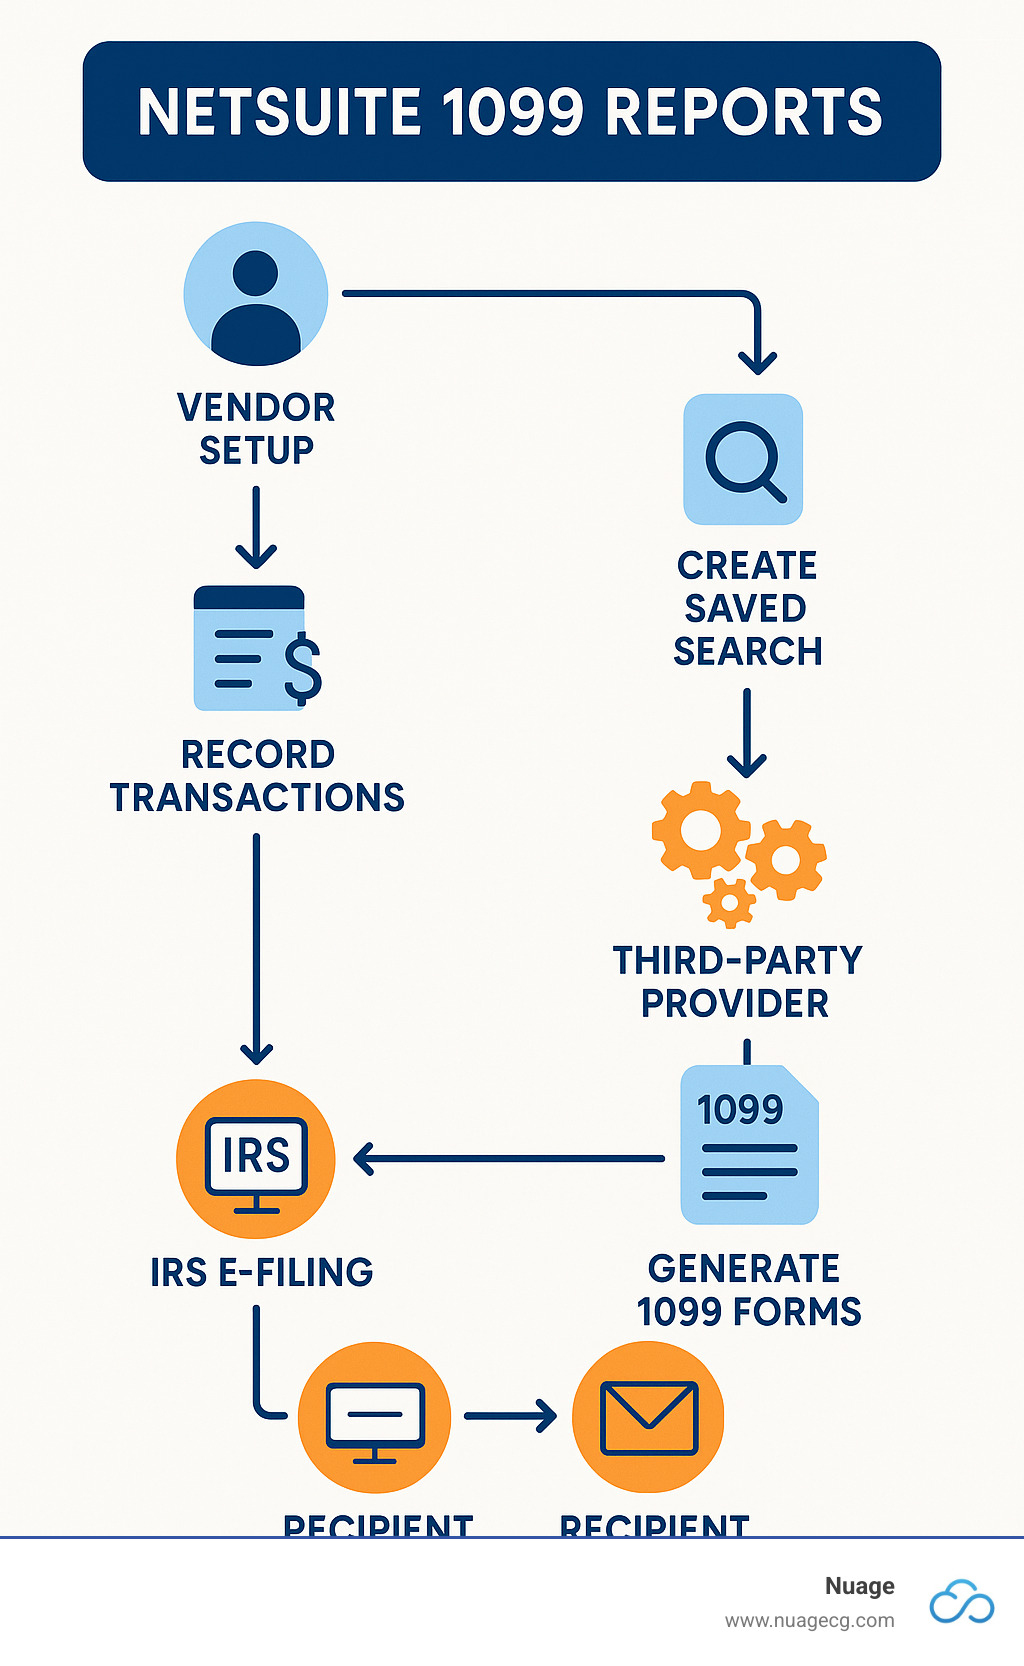
While NetSuite 1099 reports are no longer generated natively, extracting this tax data is crucial for compliance. Since NetSuite discontinued its built-in 1099 functionality in version 18.2, businesses must use saved searches to export vendor payment data to third-party filing providers.
Key Facts About NetSuite 1099 Reporting:
- Native functionality discontinued: NetSuite removed 1099 form generation starting with version 18.2.
- Saved search approach: Use customized saved searches to extract 1099-eligible vendor payment data.
- Third-party filing required: Export data to providers like Sovos, Track1099, or Yearli for form generation and filing.
- Setup requirements: Vendors must be marked as “1099 Eligible” and expense accounts mapped to 1099 categories.
- Compliance threshold: Forms are required for payments of $600 or more to non-employee contractors.
The shift away from native 1099 reporting allows NetSuite to focus on core ERP functionality while partnering with specialized tax compliance providers. This approach improves accuracy and reduces compliance risk, as dedicated 1099 providers offer features like TIN validation and automated recipient delivery.
Proper 1099 reporting is a legal requirement that can result in IRS penalties if handled incorrectly. Fortunately, NetSuite’s data extraction capabilities, combined with the right third-party partner, create a more robust solution than the old native reports.
With over 15 years of experience in NetSuite implementations, our team has guided many businesses through this transition. We have seen how to build modern, compliant reporting workflows by integrating NetSuite with third-party applications, ensuring your NetSuite 1099 reports are accurate and efficient.
Why NetSuite’s 1099 Reporting Strategy Has Evolved
NetSuite’s strategy for handling NetSuite 1099 reports has evolved to focus on its core ERP strengths while adapting to the complex world of business compliance.
Starting with version 18.2 (for the 2018 tax year), NetSuite discontinued its native 1099 form generation. This strategic shift was driven by the complexity and frequent changes in tax regulations. Instead of maintaining an in-house module, NetSuite now recommends leveraging specialized third-party providers whose sole focus is tax compliance.
This partnership approach offers significant benefits:
- Specialized Compliance: Third-party vendors are tax experts who stay current with all IRS and state-specific mandates, ensuring accuracy.
- Risk Mitigation: Dedicated solutions include validations and error checks, reducing the risk of costly filing penalties.
- Focus on Core ERP: NetSuite can dedicate development resources to improving core financial, inventory, and CRM tools.
- Streamlined Processes: These tools automate data uploads, validation, and filing, saving your team time and reducing year-end stress.
NetSuite’s stance is clear: they provide powerful data extraction tools, but the actual generation and filing of 1099 forms are best handled by dedicated tax compliance partners. This model ensures your business benefits from both NetSuite’s robust financial capabilities and deep compliance expertise.
Many of these third-party solutions, like Track1099, offer integrated bundles on NetSuite’s SuiteApp.com marketplace, making the connection to your NetSuite environment seamless. You can find the Track1099 solution on SuiteApp.com or by searching for ‘Track1099’ under Customization > SuiteBuilder > Search & Install Bundles in your NetSuite account.
Preparing Your NetSuite Environment for Accurate 1099 Data
Accurate NetSuite 1099 reports depend on proper data integrity and foundational setup. Investing time in configuration upfront ensures compliance and prevents scrambling to fix data during tax season.
Configuring Vendor Records for 1099 Eligibility
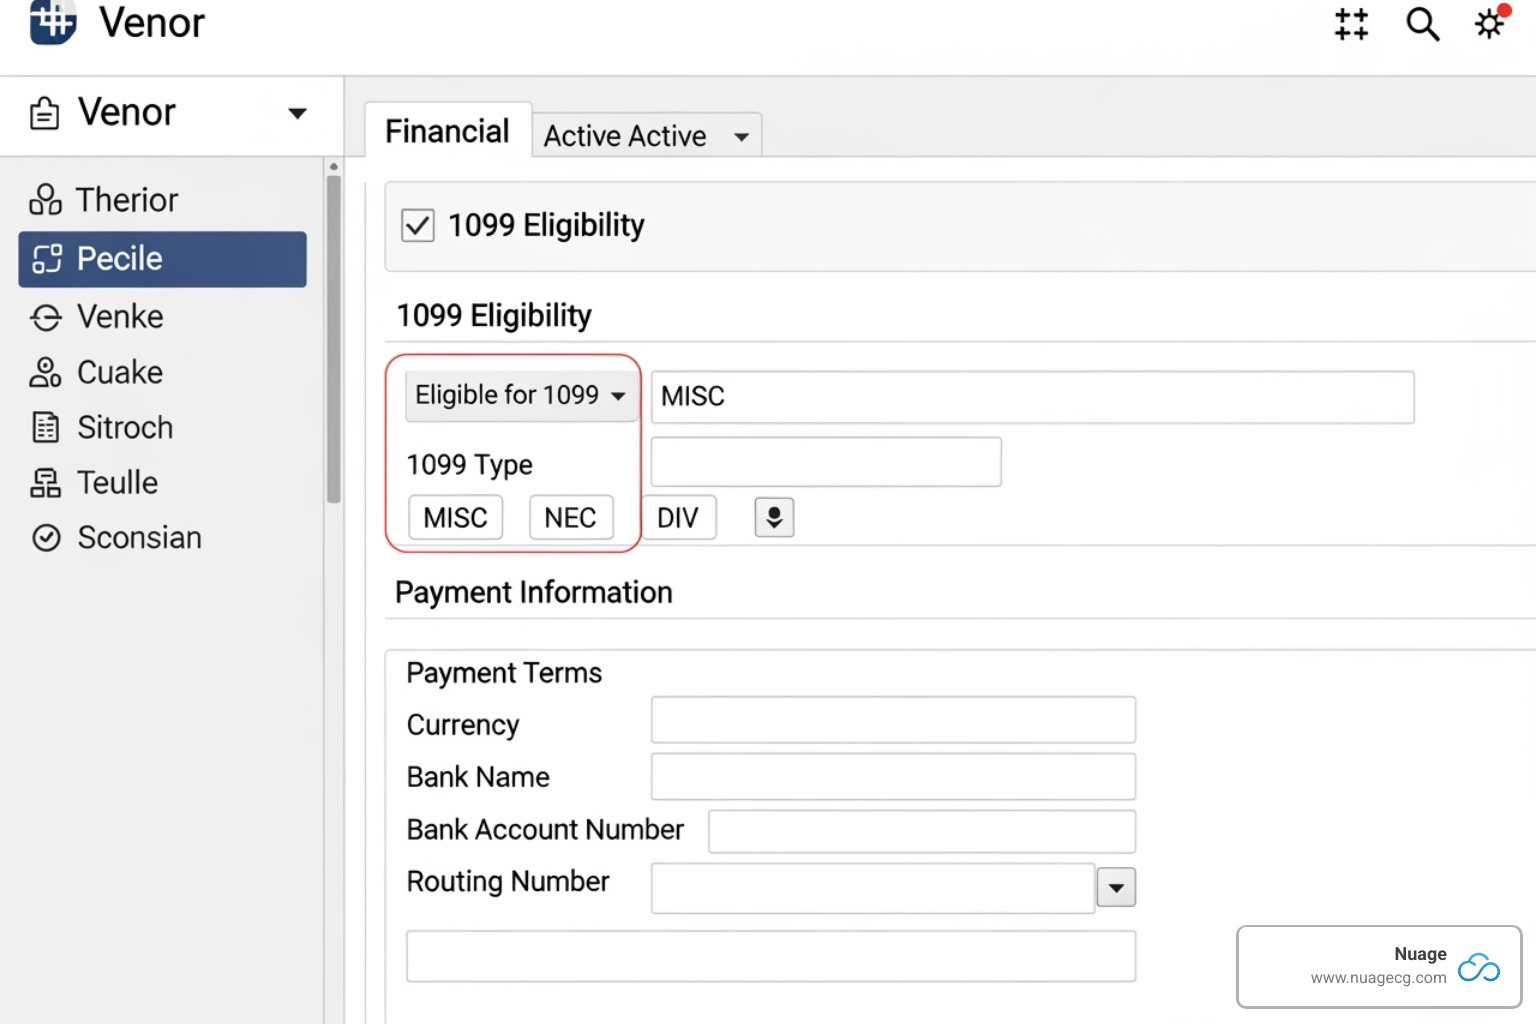
Your vendor records are the starting point. For each contractor, steer to the Financial subtab and ensure the following are correct:
- ‘1099 Eligible’ Checkbox: Check this box for any vendor who should receive a 1099 form.
- Tax ID Number (TIN): Enter the vendor’s EIN or SSN. An incorrect TIN will lead to IRS rejection.
- US-based Address: NetSuite only considers vendors with addresses in the United States or its territories as 1099 eligible.
A best practice for your NetSuite implementations is to collect a completed W-9 form from every new vendor before their first payment. This form provides all the necessary information for a correct setup. For detailed guidance, refer to NetSuite’s documentation on Vendor Records for 1099 Contractors.
Mapping GL Accounts to 1099 Categories
The second piece is mapping your Chart of Accounts. A payment to a 1099-eligible vendor will only appear in reports if the expense account is mapped to a 1099 category.
When editing an expense account (Lists > Accounting > Accounts), use the ‘1099 Category’ field to map it to the correct box on the 1099-MISC or 1099-NEC form. For example, a consulting expense should map to ‘Nonemployee Compensation’ (1099-NEC, Box 1), while office rent maps to ‘Rents’ (1099-MISC, Box 1).
1099 reporting is cash-based, so payments count when paid, not when billed. For pass-through costs that shouldn’t be reported, use a dedicated GL account with the 1099 category left blank. For more details, see NetSuite’s guide on Form 1099-MISC.
By taking care of both vendor records and GL account mapping upfront, you’re setting yourself up for smooth, accurate NetSuite 1099 reports when tax season arrives.
Mastering Saved Searches for NetSuite 1099 Reports
With NetSuite’s native 1099 form generation discontinued, saved searches are the essential tool for extracting data for your third-party filing provider. Mastering these searches transforms year-end reporting into a simple, repeatable process.
Installing and Customizing the 1099 Vendor Payment Report Bundle
NetSuite provides a pre-configured bundle to simplify data extraction.
- Install the Bundle: Steer to
Customization > SuiteBuilder > Search & Install Bundles. Search for “1099 Vendor Payment Report” and click ‘Install’. - Customize the Search: Access the new saved search at
Reports > Saved Searches. Click ‘Edit’ to adjust the Criteria Tab (e.g., set the date range for the tax year) and the Results Tab (ensure columns match your third-party provider’s import requirements).
This bundle is a great starting point, but you may need to customize it further for your specific needs.
Building a Custom Saved Search for your netsuite 1099 reports
For ultimate control, build a custom transaction saved search (Reports > New Saved Search > Transaction).
Criteria:
- Type:
Any of Bill, Bill Credit, Check, Journal Entry. - Status: Exclude open, pending, or cancelled statuses to only include paid transactions.
- Vendor: 1099 Eligible:
is true. - Main Line:
is falseto analyze individual expense lines. - Date:
withinyour reporting period (e.g.,1/1/YYYYto12/31/YYYY). - Posting:
is true.
Results:
- Group By: Vendor information like
Vendor: Name,Vendor: Tax ID, and address fields. - Sum By: Use ‘Formula (Numeric)’ fields with a
SUM(CASE WHEN ...)statement to aggregate amounts for each 1099 box. For example, to calculate rents:SUM(CASE WHEN {account.category1099misc} = '1. Rents' THEN {amount} ELSE 0 END). - Other Fields: Include
Date,Type, andDocument Numberfor reference.
This custom search provides the flexibility to create a perfect data file for your NetSuite 1099 reports.
Exporting and Verifying Your 1099 Data
After running your search, export the results as a CSV or Excel file. Before uploading to your filing partner, perform a final validation:
- Verify Accuracy: Spot-check large payments and vendor details against your W-9s.
- Filter by Threshold: Remove vendors with total payments below the $600 IRS threshold.
- Check for Missing Data: Ensure all vendors have a valid address and tax ID.
- Review Credits: Double-check that bill credits are correctly netted against total payments.
You are ultimately responsible for the data reported to the IRS. As NetSuite notes, you should always review the output for accuracy.
View the Exporting 1099–MISC Information video
Properly configured saved searches are key to reliable NetSuite 1099 reports. If you need help optimizing your system, our team at Nuage is ready to assist with your NetSuite implementations.
Ensuring IRS Compliance and Choosing a Filing Partner
Once you’ve extracted your data, the final step is filing with the IRS and distributing forms to contractors. A third-party filing partner is essential for this, changing your verified data from NetSuite 1099 reports into official, compliant filings. While NetSuite is a premier ERP, specialized tasks like 1099 filing are best handled by dedicated solutions. Learn more about our NetSuite services and how we can help.
Key Considerations for a Third-Party Solution
When choosing a third-party provider, look for these key features:
- Integration Method: A simple CSV/Excel import or a direct API connection.
- TIN Validation: Automatic checking of Tax ID Numbers against the IRS database.
- Correction Processing: An easy process for filing corrected forms.
- Form Support: Handles all necessary forms (1099-NEC, 1099-MISC, etc.).
- E-Filing and Recipient Delivery: Manages electronic filing with the IRS and state agencies, plus mail and online portal delivery to recipients.
- Security and Support: Robust data security and responsive customer support.
- Cost Structure: Clear pricing that aligns with your filing volume.
Best Practices for Maintaining Clean Vendor Data
Maintaining clean vendor data throughout the year is crucial for accurate NetSuite 1099 reports.
- Mandate W-9 Collection: Make W-9 collection a required step in your vendor onboarding process.
- Perform Regular Audits: Periodically run a saved search to find 1099-eligible vendors with missing TINs or addresses and compare NetSuite data against your W-9s.
- Encourage Communication: Ask vendors to promptly report any changes to their address or tax status.
The IRS provides detailed guidance on Form 1099-MISC and other reporting requirements.
Addressing Common Challenges in netsuite 1099 reports
Be aware of these common challenges when preparing your NetSuite 1099 reports:
- Bill Credits and Write-Offs: Ensure your saved search correctly nets these against payments and that write-off accounts are not mapped to a 1099 category.
- Foreign Currency Payments: Verify that your search formulas correctly convert foreign currency transactions to your base currency for accurate reporting.
- Cash Basis Reporting: Confirm your search captures all cash payments made during the year, including direct checks, not just paid bills.
- Partial Payments: Ensure your search correctly sums all partial payments made to a vendor within the tax year.
Frequently Asked Questions about NetSuite 1099 Reporting
Navigating NetSuite 1099 reports can bring up questions. Here are answers to some of the most common ones we encounter.
What is the difference between Form 1099-NEC and 1099-MISC?
Form 1099-NEC (Nonemployee Compensation) is used exclusively for payments of $600 or more to independent contractors for services. The IRS reintroduced it in 2020 to separate these payments from Form 1099-MISC (Miscellaneous Income), which is now used for other payments like rents, royalties, and prizes. Proper mapping of your GL accounts in NetSuite is key to distinguishing between the two.
Do I have to use a third-party tool for 1099s with NetSuite?
Yes. Since NetSuite discontinued native form generation with version 18.2, you must use a third-party tool. The standard workflow is to extract data using NetSuite’s Saved Searches and then upload it to a specialized provider like Sovos, Track1099, or Yearli for form generation, e-filing, and distribution. As your NetSuite Optimization Engine, Nuage can help streamline this process. Learn more about our Nuage NetSuite Services.
How do I include payments made by check in my saved search?
To ensure your saved search includes all payments, including direct checks not tied to a vendor bill, adjust your criteria:
- Transaction Type: Include ‘Check’ and ‘Journal Entry’ in addition to ‘Bill’ and ‘Bill Credit’.
- Date Field: Use the transaction ‘Date’ field for your date range filter, not ‘Date Closed,’ to capture all payments made within the tax year on a cash basis.
Conclusion
The evolution of NetSuite 1099 reports has led to a more reliable and streamlined approach to tax compliance. By combining NetSuite’s powerful data management with the expertise of specialized third-party providers, you create a robust and accurate reporting system.
The key to success is a solid foundation: properly configured vendor records and correctly mapped GL accounts. This turns a complex year-end task into a predictable, routine process.
At Nuage, our role as your NetSuite Optimization Engine is to ensure every part of your NetSuite implementation works seamlessly. Your path to data accuracy and compliance confidence is clearer than ever. If you need assistance refining your process, you don’t have to do it alone.
Get help with your NetSuite 1099 process
